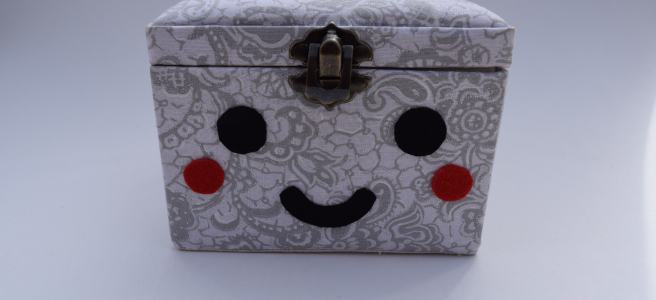
For Project 1, I created an Artificial Human Companion called the Sad Box. I needed a place to keep my USB and help remind me to return my USB when I’m done using it. The Sad Box is designed to solve this problem because it has an emotional attachment to my USB. When my USB is removed from the Sad Box it says, “oh no.” Then, after a small period of time, 10 seconds for demonstration purposes, the Sad Box will start to sniffle. If the USB is still not returned the Sad Box will start to cry. While the USB is missing from it’s spot, the Sad Box will alternate sniffling and crying in 10 second intervals. When the USB is returned to Sad Box, it will shout, “Yay!”. This system helps me remember to put my USB back where it belongs because it gives audio feedback to alert me and there is an incentive to try to make the box happy and stop it from crying.
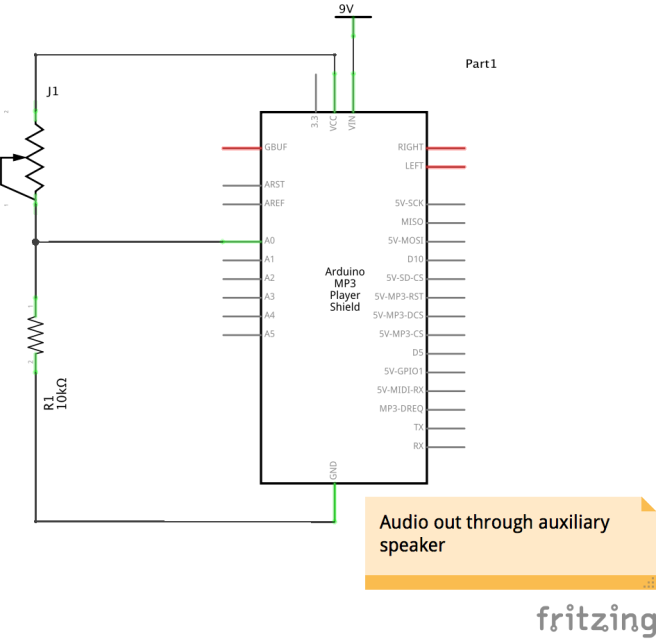
The first elements of my project that I started prototyping with were, a force sensitive resistor, Arduino MP3 shield, and Arduino mini. The force sensor is used to detect when the USB is inside or outside of the box. The MP3 shield has the ability to store MP3 files and output the sound through an auxiliary chord. Through this process I was able to build my circuit and begin to test the force sensor values for when the USB was on and off of the sensor.


The Arduino code used to power my project involves using booleans to determine whether the USB is inside or outside the box and if statements the ensure that the correct sound plays at the right time.
This file contains bidirectional Unicode text that may be interpreted or compiled differently than what appears below. To review, open the file in an editor that reveals hidden Unicode characters.
Learn more about bidirectional Unicode characters
| //MP3 shield libraries | |
| #include <SPI.h> | |
| #include <SdFat.h> | |
| #include <SdFatUtil.h> | |
| #include <SFEMP3Shield.h> | |
| //Initialize sd card and MP3 shield | |
| SFEMP3Shield MP3player; | |
| SdFat sd; | |
| //Create variable to store pressure sensor value | |
| int analogValue=0; | |
| //Stores if the USB is inside the box | |
| boolean isInside=false; | |
| //Variables control which sound will be played | |
| boolean isCheering=false; | |
| boolean isFirst=true; | |
| boolean isSigh=false; | |
| boolean isSniffle=false; | |
| boolean isCry=false; | |
| //Variable used for timing and creating intervals between audio | |
| unsigned long previousMillis=0; | |
| void setup() { | |
| Serial.begin(9600); | |
| sd.begin(SD_SEL, SPI_HALF_SPEED); | |
| MP3player.begin(); | |
| //Increase the volume of audio output | |
| MP3player.setVolume(0x00, 0x00); | |
| } | |
| void loop() { | |
| //Calls the function to check if the USB is in box | |
| isInside=boxFull(); | |
| unsigned long currentMillis=millis(); | |
| //If the USB is removed and no other sound has been played, "oh, no" plays | |
| if(!isInside && isFirst){ | |
| previousMillis=currentMillis; | |
| //Stops any track already playing | |
| MP3player.stopTrack(); | |
| //Ensures that cheer plays when USB returned | |
| isCheering=true; | |
| isFirst=false; | |
| //Calls function to play "oh no" | |
| playSigh(); | |
| } | |
| //If checks that the USB is outside box and its been 10 seconds since last track play | |
| //also makes sure that sniffle isn't played twice in a row | |
| else if(currentMillis-previousMillis>10000 && !isInside && !isSniffle){ | |
| previousMillis=currentMillis; | |
| MP3player.stopTrack(); | |
| isCheering=true; | |
| isFirst=false; | |
| //Ensures that cry plays next time | |
| isSniffle=true; | |
| isCry=false; | |
| //Cals function to play sniffle | |
| playSniffle(); | |
| } | |
| //If checks that the USB is outside box and its been 10 seconds since last track play | |
| //also makes sure that cry isn't played twice in a row | |
| else if(currentMillis-previousMillis>10000 && !isInside && !isCry){ | |
| previousMillis=currentMillis; | |
| isCheering=true; | |
| //Ensures that sniffle plays next time | |
| isCry=true; | |
| isSniffle=false; | |
| //Calls function to play sniffle | |
| playCry(); | |
| } | |
| else if(isCheering && isInside){ | |
| MP3player.stopTrack(); | |
| previousMillis=0; | |
| //Calls function to play cheer | |
| playCheer(); | |
| //Resets variables for when USB is removed again | |
| isCheering=false; | |
| isFirst=true; | |
| isSigh=false; | |
| isSniffle=false; | |
| isCry=false; | |
| } | |
| } | |
| boolean boxFull(){ | |
| //Gets analog force sensor value | |
| analogValue=analogRead(A0); | |
| Serial.println(analogValue); | |
| //Checks if the USB is inside or outside | |
| if(analogValue<50){ | |
| //USB is outside | |
| return false; | |
| } | |
| else{ | |
| //USB is inside | |
| return true; | |
| } | |
| } | |
| //Functions to play certain track numbers from sd card | |
| void playSigh(){ | |
| MP3player.playTrack(1); | |
| } | |
| void playSniffle(){ | |
| MP3player.playTrack(2); | |
| } | |
| void playCry(){ | |
| MP3player.playTrack(3); | |
| } | |
| void playCheer(){ | |
| MP3player.playTrack(4); | |
| } |
After prototyping the electronics, I started also prototyping the enclosure. Using cardboard and paper I created a box that would hold both the USB and Arduino. Out of cardboard I cut two rectangles and sandwiched the pressure sensor in between. One of the layers of cardboard has a hole for the sensor to connect to the bread board and the other has a hole to perfectly contain the USB, making sure that the USB is resting on top of the pressure sensor. This prototype allowed me see the interaction between my object and the user. Also, after prototyping with this box I learned that the box would need to be bigger if I wanted to fit the speaker and power source inside the box.


At this point I started to move my circuit off of the breadboard and begin the enclosure for the final product. I found a box with a lid that was pretty deep at Joann’s. I also found thin pieces of craft wood that I laser cut with holes that fit my USB and allowed me connect the pressure sensor to the rest of the circuit. I placed the pressure sensor in between the two pieces of wood and placed a piece of paper over the sensor so you couldn’t see it. I also covered the two pieces in felt to match the box and create a separator between where the USB is placed and where all the electronics go. In the corners of the box I placed short dowels so that when the separator is placed in the box, it isn’t pushed all the way to the bottom. The ribbon attached to the separator is used to pull the separator out whenever the electronics need to be accessed.


Audio feedback is output through an auxiliary chord and into a speaker. This was a good option because I could increase the volume of the speaker using code and quality of the audio was better than other options. The only downside is that that speaker itself also has to be charged. I ultimately decided on using a 9V battery to power the rest of my project. Everything, including the Arduino, speaker, and battery, fit inside the lower part of the box so that the box doesn’t have any wires coming out of it.


Also, to emphasize the human emotion and relate the audio to the box, I used felt to give the Sad Box a face and some personality.


The following video demonstrates how the Sad Box works. The intervals between cries are short for demonstration purposes; however, the intervals can be increased to reflect how long it takes to actually use a USB.
Project 1: Sad Box from kshioshita on Vimeo.
